Knowing Eye Makeup Step By Step processes is vital for beginners, as it provides a strong basis for becoming an expert in applying eye makeup. By comprehending the step-by-step procedure, beginners might improve their abilities and self-assurance in developing stunning eye appearances. These strategies aid in people’s comprehension of the basics of ocular anatomy, product selection, and suitable application methods. Additionally, learning simple techniques ensures that makeup is done precisely and evenly, highlighting natural features and reducing mistakes. Learning these abilities also allows people to try out different looks and fashions, promoting creativity and individuality.
Ultimately, developing confidence in oneself and one’s ability to create amazing looks is equally essential as enhancing looks while learning eye makeup step by step for beginners.
Understanding Basic Eye Anatomy
Overview of Eye Parts Relevant to Makeup Application
An overview of eye parts relevant to makeup application is crucial for understanding how to enhance your natural features effectively. Here’s a breakdown:
1. Eyebrows: Give a face structure by enclosing and shaping the eyes. Attractive eyebrows may even out your features and enhance your eye makeup.
2. Eyelids: The primary area to apply eyeshadow. There are opportunities to highlight specific characteristics while offering depth and character in various areas of the eyelids.
3. Eyelashes: Give your eyes more definition, length, and volume to enhance them. False eyelashes and mascara can draw focus on eyelashes, giving an illusion of larger, appealing eyes.
The inner line of the eyelids is known as the waterline. The waterline can be accentuated with eyeliner or eyeshadow, but care must be given to avoid smearing or discomfort.
Eye Makeup Step By Step
Importance of Knowing Eye Anatomy for Makeup Placement
Understanding eye anatomy for makeup placement is crucial for achieving stunning results. It allows for precise application, ensuring makeup enhances natural features without irritating. Knowledge of eye structures enables balanced and proportionate makeup application, highlighting key areas effectively. Additionally, it helps avoid common mistakes and ensures eye makeup step by step For Beginners is applied safely. By mastering eye anatomy, individuals can create flawless eye makeup looks that accentuate their beauty with precision and confidence.
Preparing Your Eye Area
Applying Primer for a Smooth Base Eye Makeup Step By Step
By smoothing out wrinkles and closing in fine lines, primer helps give a smooth basis for eye makeup. By doing this, eyeshadow is applied consistently and has a greater wear time during the day. To best impact, apply a tiny bit of primer onto your eyelids and softly mix with your fingertips.
Choosing the Right Eye Makeup Step By Step Products
Essential Eye Makeup Products for Beginners
For Beginners, Essential Eye Makeup Products Include:
Beginners should have a neutral-hued eyeshadow palette, a liquid or pencil liner to define the eyes, mascara to grow out and expand lashes, an eyebrow pencil or powder to shape brows, and a curler for eyelashes for lifting lashes as necessary eye makeup step by step. Beginners can learn basic makeup techniques and create various kinds of eye designs using these basic items.
Quality versus Cost-Effective Choices
Beginners often find it difficult to decide between high-quality and reasonably priced eye makeup products. This is a contrast:
Quality Options
Better formulas with enhanced coloration, blend-ability, and longevity typically appear in higher-end beauty products.
Premium components that are gentler to the skin and are less inclined to cause irritation or trigger allergic reactions frequently appear in high-quality products.
Long-term investment: Products of excellent quality might cost extra initially, but they may last more time and need to be changed more rarely.
Budget-Friendly Options
Budget-friendly or drugstore brands provide affordable alternatives with respectable quality and performance.
As beginners who want to experiment with new colors and styles without going over budget, these choices are excellent.
Accessibility: Most shops have affordable choices, which make it easy for new customers to purchase them.
The choice between affordable and high-quality choices eventually boils down to personal preferences, financial limitations, as well as desired results. Beginners could start with less expensive selections and gradually upgrade to better ones as their skills and tastes improve.
Step 1: Eyebrow Shaping and Grooming
Tools Needed for Brow Grooming
Techniques for Achieving Well-Groomed Brows
Achieving well-groomed brows involves several techniques
- Determine Shape: Use the natural shape of your brows as a guide or seek professional advice for shaping.
- Tweezing: Pluck stray hairs below and between the brows while following the natural arch.
- Trimming: Use brow scissors to trim long hairs, brushing them upward before cutting.
- Filling: Fill sparse areas with a brow pencil or powder, using light, feathery strokes.
Setting: To control unruly hair and hold it in place during the day, apply eyebrow gel.
You may have exquisitely styled eyebrows that nicely frame your face by learning how to apply these techniques.
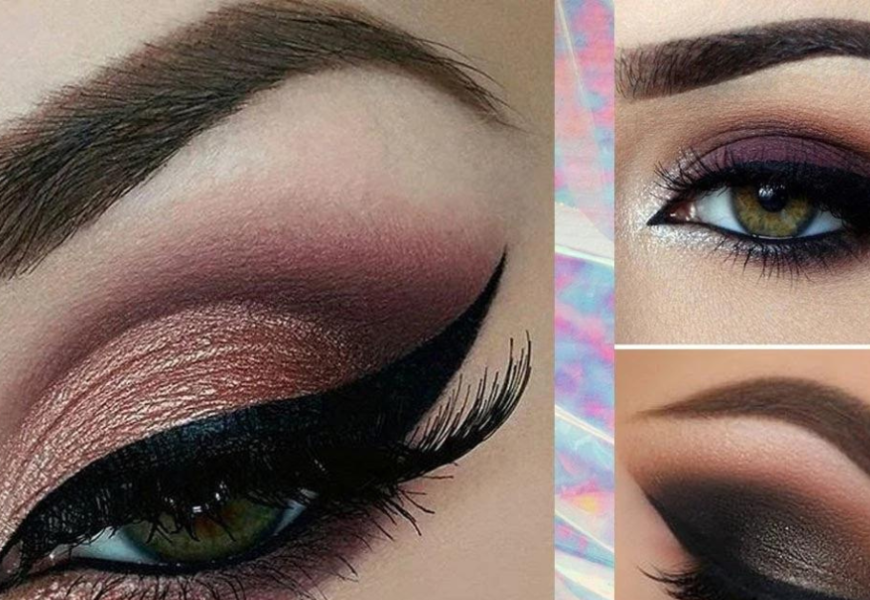
Step 2: Applying Eyeshadow
Essential Methods for Applying Eyeshadow (Lid, Crease, Brow Bone)
Lid: Lightly coat the entire eyelid with the basic eyeshadow color using a fingertip or a flat makeup brush. This color serves as the foundation color for the remainder of your eyeshadow look.
Crease: Use a little deeper eyeshadow color and an eyebrow brush to create the crease on the eyelid. Starting from the outside corner and progressively strengthening it, mix the color into the crease by moving the wipers on the windshield back and forth.
Brow Bone: To add additional lifting and depth to the eyes, use a highlighter or lightly shimmering eyeshadow beneath your browbone. Use a tiny eyeshadow brush to apply the highlighter; mix it carefully with the color on the hairline for an effortless change.
You may get an assortment of eye makeup styles that enhance your natural eye shape and features by getting proficient in these basic steps for applying eyeshadow.
Choosing Eyeshadow Colors and Finishes for Beginners
Because they are adaptable and simple to apply with, neutral eyeshadow colors like taupe, brown, and beige are great options for beginners. Matte finishes are great for daily usage, but for occasions that are special, glittering or glittery colors can add glamour. As your trust in your color choice grows, start small and work your way out to a larger palette.
Step 3: Eyeliner Application
Different Types of Eyeliners and Their Effects
- Pencil Eyeliner: Soft and easy to control, ideal for creating natural looks or smudged effects along the lash line.Excellent for beginners and adaptable for both lower and upper lids.
- Sharp, defined lines and dramatic winged effects may be created with liquid eyeliner’s deep color and accurate lines. requires practice and a steady hand to be exact.
- Gel eyeliner: Provides the ease of application of a pencil with the precision of liquid. It typically applies with a brush, allowing a controlled, smooth application and producing durable, strong lines.
- Pen Eyeliner: This product is ideal for creating clean lines or sharp wings because it blends the ease of use of a pencil with the accuracy of liquid eyeliner. Perfect for those who have difficulty applying liquid liners.
A range of eye makeup looks, from gentle and natural to bold and dramatic, may be produced with various kinds of eyeliner, each having special effects and benefits.
Step-by-Step Guide to Applying Eyeliner for Beginners
Start with a pencil, liquid, or gel liner if you’re new to makeup. Steadying your hand, begin from the inner corner, extending to the outer corner for a winged look if desired. Fill in any gaps and clean up mistakes with a cotton swab. Practice and patience lead to mastery.
Step 4: Mascara Application
Choosing the Right Mascara for Your Lashes
Consider your favorite lash style and any specific needs that your lashes might have when selecting a mascara. For volume, opt for a thickening formula with a fluffy wand. Lengthening mascaras feature elongated brushes for extending lashes. Curling mascaras lift and curl straight lashes. Waterproof formulas are ideal for long wear, while gentle formulas suit sensitive eyes.
Start with clean, curling lashes for maximum volume and length when using mascara. Start by wiggling the wand and then move it higher. For length, highlight the tips; for volume, layer carefully. Utilizing a new spoolie, process to avoid clumping.
How to Get a Wide-Awake Look with Lash Curlers
Use an eyelash curler before applying mascara if you’d like to look extremely awake. Press your lashes softly, beginning at the root, for a brief look. lashes to make your eyes look larger. Avoid clumps by wiping excess product off the wand.
Step 5: Adding Extra Definition (Optional)
Move the curler outwards, repeating if necessary. This lifts and opens up your eyes, making them appear more alert and refreshed.
Applying False Lashes for Extra Drama (Optional)
For extra drama, apply false lashes. After trimming the band to fit the shape of your eyes, apply lash glue along it and wait for it to get set. Place the lashes with tweezers as close to your natural lash line as you are able, then gently push for adherence. A mascara may properly combine real and fake lashes.
Final Touches and Cleanup
Blending Eyeshadow for a Seamless Look
Start with transition hues in the crease and use your windshield wiper motions to mix eyeshadow flawlessly. Next, use small circular motions to mix inward darker colors in the inner corner. Use a clean brush to blend any harsh lines. Repeat until colors transition smoothly, creating a seamless gradient effect for a polished look.
Correcting Mistakes and Cleaning Up Fallout
Use a cotton swab soaked in the remover or a clean makeup brush to wipe up eyeshadow spills and mistakes. Wipe or dab the affected area gently to get clear of any leftover substances or smudges. For fallout, use a makeup wipe or cotton pad to clean under the eyes. Pat lightly to blend and reapply concealer if necessary for a flawless finish.
Conclusion
In conclusion, understanding the precise and assured methods for applying Eye Makeup Step By Step For Beginners enables beginners to enhance their natural appearance. Beginners may create beautiful eye looks that suit their tastes by learning how to apply methods including lash enhancement, eyeshadow mixing, and eyeliner. Each step becomes an effortless, integrated part of their makeup routine with patience and experience, giving up a world of creative and expressive options.
FAQS
Q: Which important makeup products are necessary for the eyes?
A: Extras are needed; these include lash curlers, mascara, eyeshadow brushes, and eyeliner.
Q: How do I pick the makeup colors that work most effectively for me?
A: For beginners, adhere to muted colors like browns and taupes; for enhancing hues, take into consideration the hue of your eyes.
Q: How can I pick the best type of eyeliner for my skin tone?
A: Experiment using different eyeliner formulas and application equipment to determine which ones match your desired looks and skill level the best. Try pencil, liquid, gel, and pen eyeliners.
Q: Do my lashes need to be curled before or after applying mascara?
A: For maximum lift and curl, curl the lashes before using mascara. Before utilizing the curler, just make sure your lashes are dry.
Q: How can errors in my eye makeup application be corrected?
A: A clean brush should be applied to blend out any strong lines and a cotton swab dipped in the remover should be used to fix errors lightly.
Eye Makeup Step By Step